

Uploading Assets
UnoPim DAM gives you several ways to get files into your library — the + New menu, drag-and-drop, and full folder upload that recreates your folder structure inside the DAM.
The + New Button
Everything you can add to the library starts from the + New button at the top right of the asset gallery. There is no separate upload button — clicking + New opens a short menu:
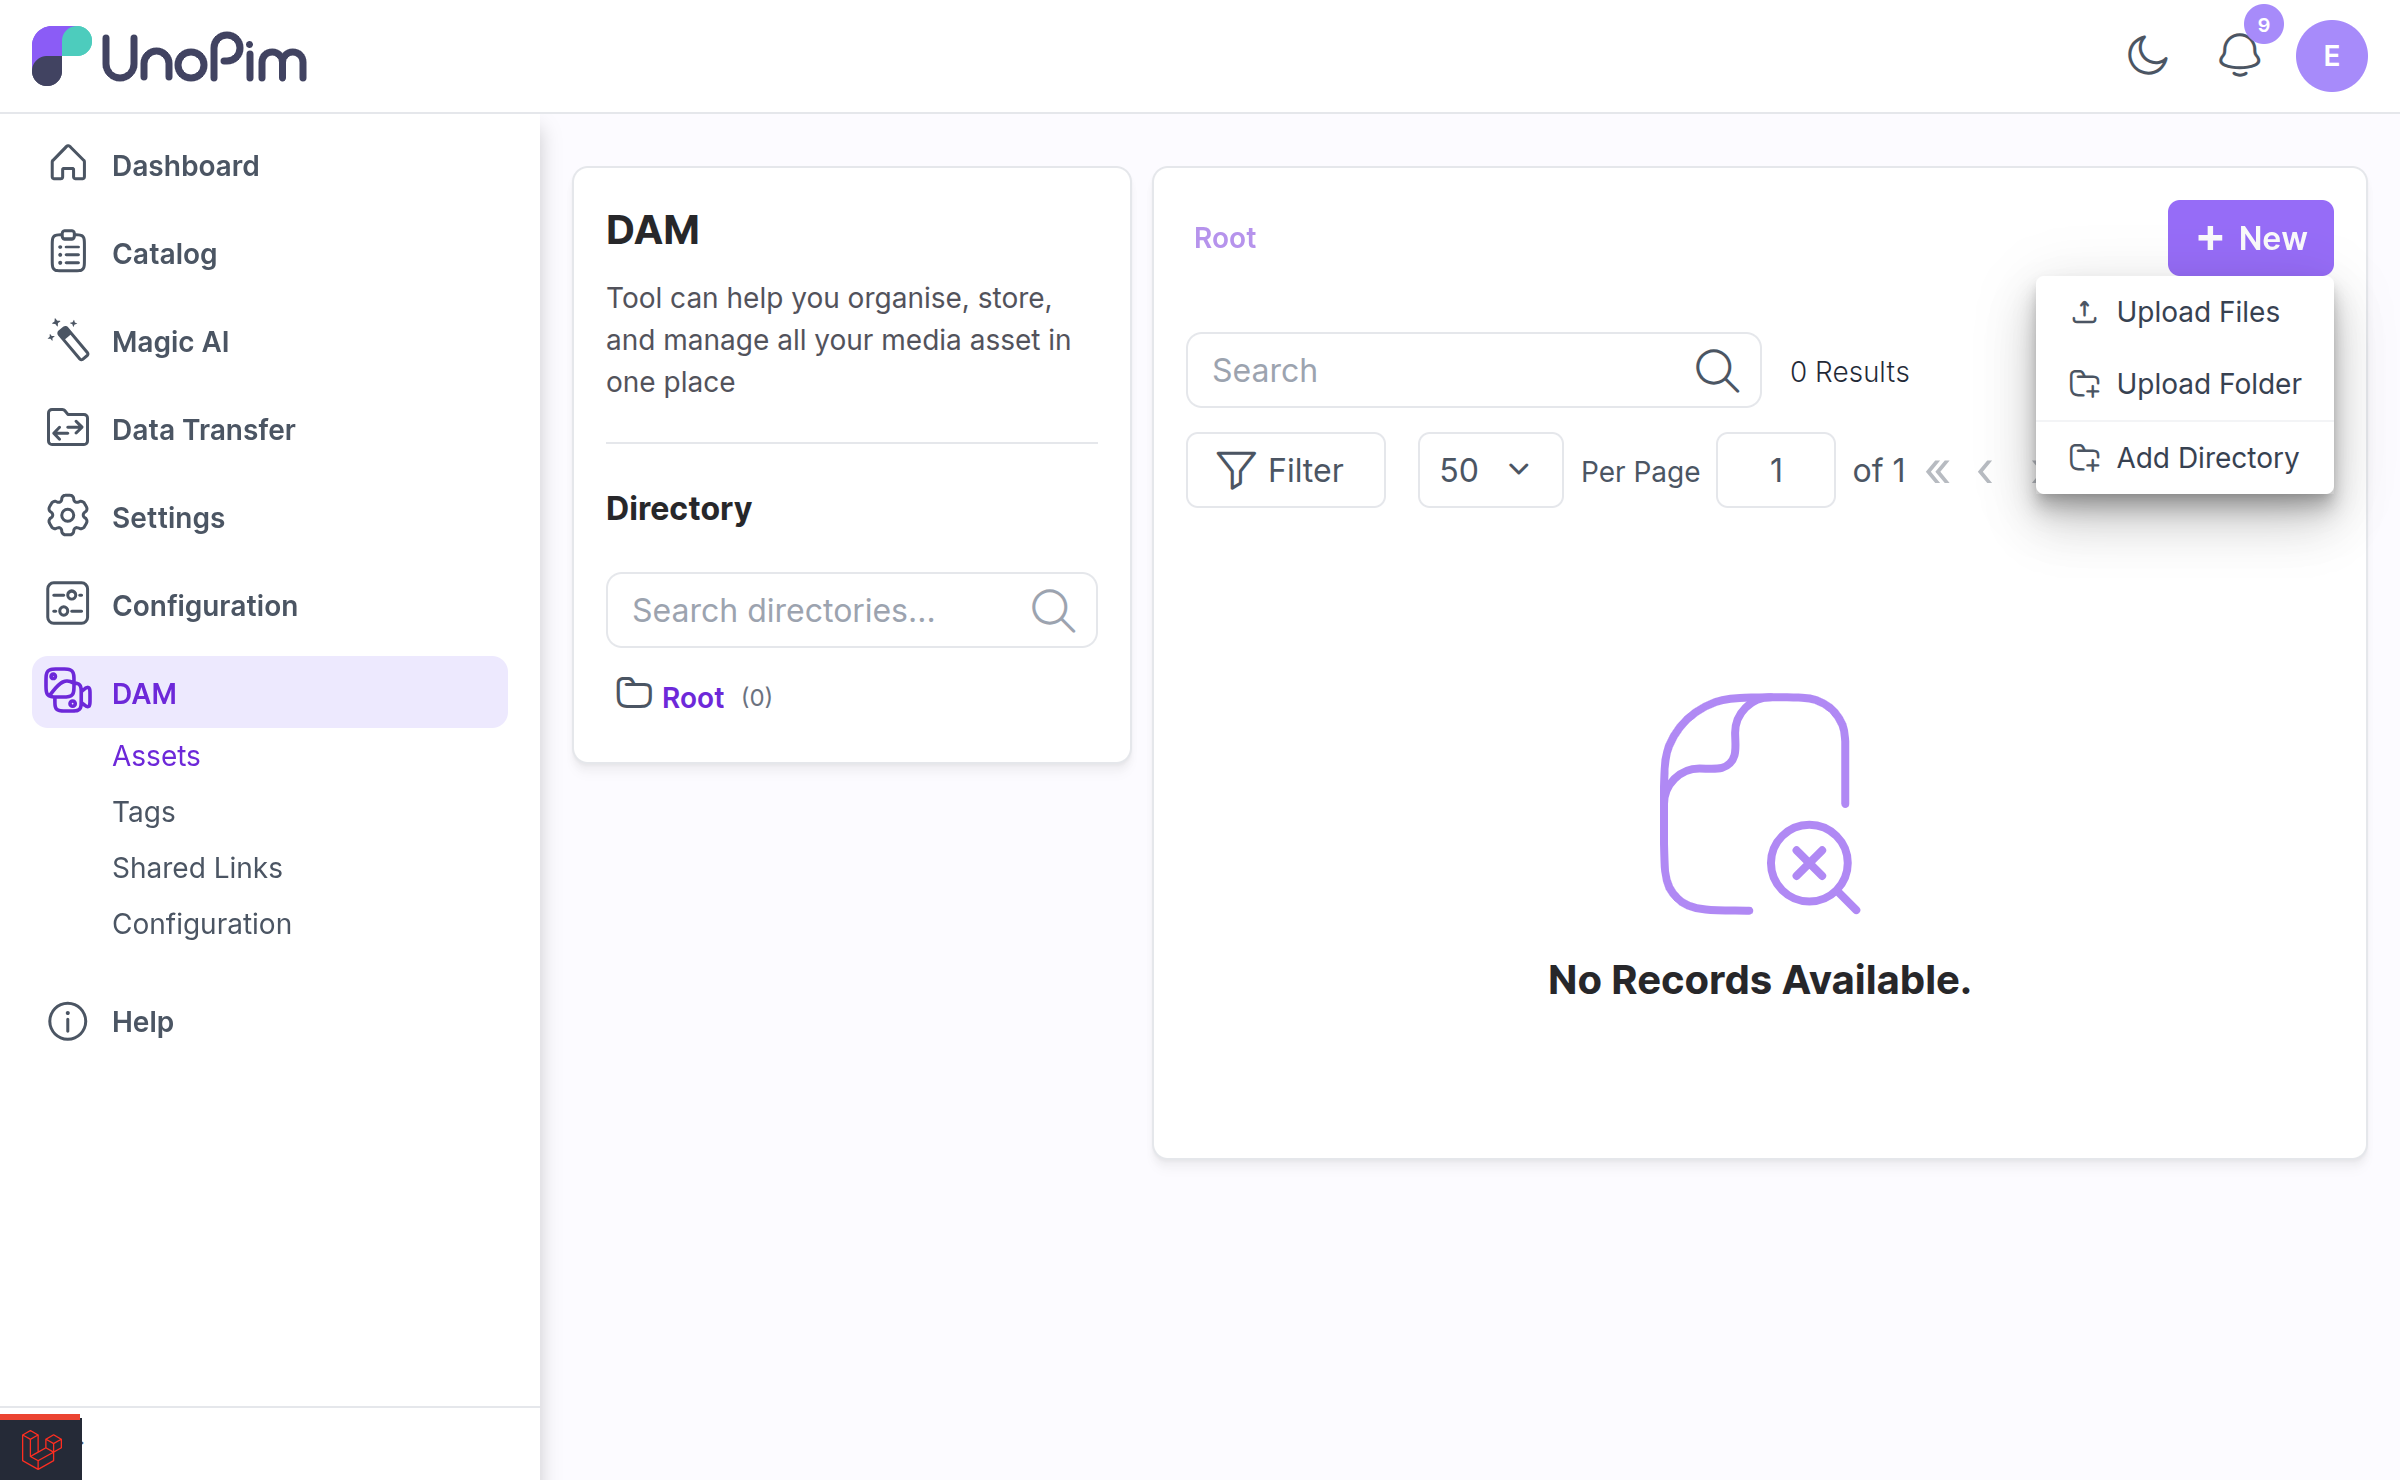
| Menu item | What it does |
|---|---|
| Upload Files | Opens the file picker. Choose one or more files; they upload into the directory you are currently viewing. |
| Upload Folder | Opens the folder picker. DAM uploads the whole folder tree and recreates its structure — see Folder Upload. |
| Add Directory | Creates a new subfolder in the current directory. |
NOTE
Add Directory only appears if your role has the create-directory permission (dam.directory.store). The two upload options are always shown; whether a given directory actually accepts an upload is checked separately. See Directory Permissions.
Uploads always go to the directory you are currently in, shown in the breadcrumb above the gallery. Navigate to the target folder first, then use + New.
Other Ways to Upload
| Method | How to use it |
|---|---|
| Drag and drop | Drag files straight from your desktop onto the gallery. A drop zone appears reading "Drop files or folders to upload". |
| Right-click → Upload Files | Right-click a directory in the tree and choose Upload Files to upload into that specific folder without navigating to it first. |
| Right-click → Upload Folder | Right-click a directory and choose Upload Folder to upload an entire folder tree into it. |
NOTE
If you do not have upload permission for the directory you are pointing at, the drop zone tells you so: "You do not have permission to upload here." See Directory Permissions.
The right-click routes are handy when you want to drop files into a folder you can see in the tree but are not currently browsing. They are available in both the standard gallery and the Explorer.
Folder Upload
Instead of uploading files one directory at a time, you can upload a whole folder and let DAM rebuild the hierarchy for you.
- Navigate to the directory you want to upload into.
- Click + New → Upload Folder — or right-click the directory in the tree and choose Upload Folder, or simply drag a folder from your desktop onto the gallery.
- Select the folder. DAM recreates every subfolder underneath the target directory and uploads the files into the matching folders.
Folders that already exist are reused rather than duplicated, so re-uploading the same tree will not create Images (1), Images (2), and so on.
If some files in the folder are rejected (see Blocked file types below), the upload still completes and DAM reports how many were skipped:
Folder uploaded with 3 file(s) skipped due to errors.
IMPORTANT
Folder upload requires a secure connection (HTTPS). On plain HTTP, the browser blocks the folder-picker API and you will see:
- "Folder upload requires a secure connection (HTTPS)."
- "Empty folders will not be created without a secure connection (HTTPS). Files will still be uploaded."
Newly created subfolders are granted to your role automatically, so they are usable straight away — no page reload needed.
Tracking an Upload in Progress
While an upload is running, the + New button itself becomes the status indicator:
- The label changes from New to Uploading... and the
+is replaced by a spinner. - The button is greyed out and unclickable, so you cannot start a second upload on top of the first.
- A Cancel button appears next to it.
The button also locks while a background directory operation is in progress — see Background Operations.
Once the upload finishes, the button reverts to + New and you see "Upload complete".
Large uploads run in the background as queued jobs, with a progress panel that stays visible while files transfer.
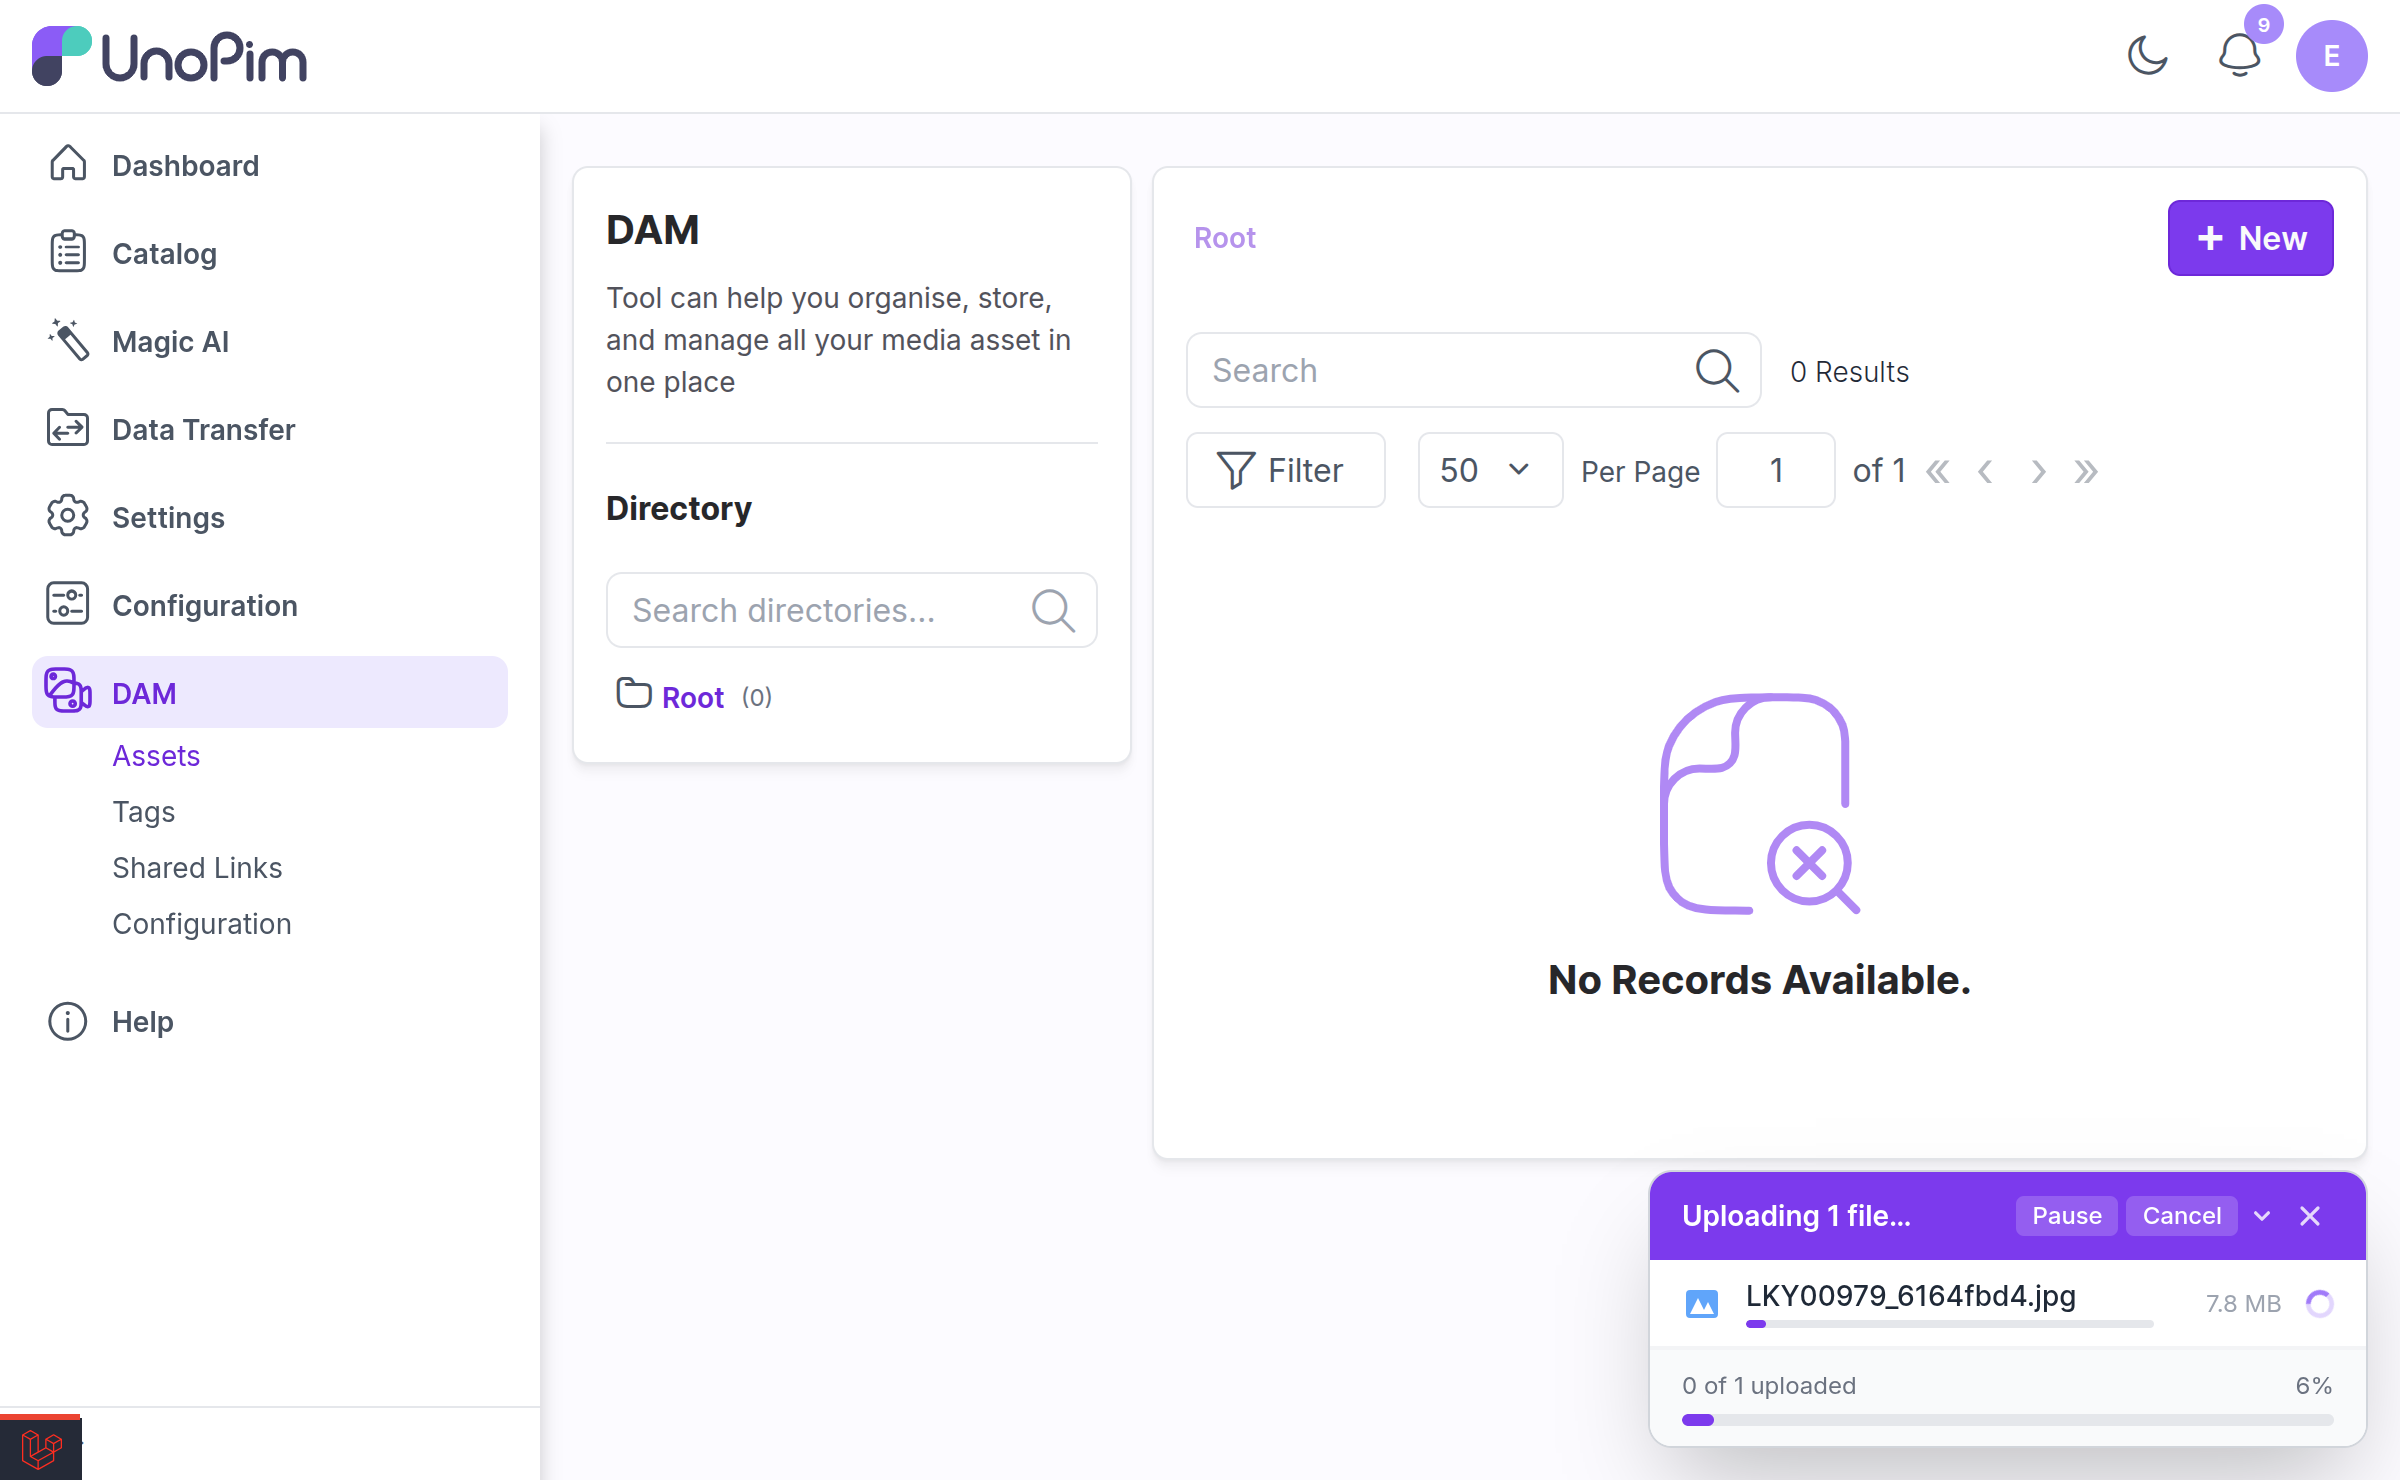
The panel gives you four controls:
| Control | When it appears | What happens |
|---|---|---|
| Pause | While files are still transferring | Stops sending new files. "Upload paused. Existing assets are untouched — resume anytime." |
| Resume | While the upload is paused | Re-queues every batch that had not finished. "Upload resumed." |
| Cancel | While work is outstanding, or while paused | Stops the upload. "Upload cancelled. Already-uploaded assets were kept." |
| Retry | When a file failed and nothing else is running | Re-queues the failed files. "Retrying the failed uploads in the background." |
Already-uploaded files are always kept — pausing or cancelling never rolls back assets that already made it into the library.
NOTE
Uploads are processed by the queue. Make sure a queue worker is running (php artisan queue:work), otherwise files will sit pending. See Installation.
Leaving the page mid-upload
If you navigate away while an upload is running, DAM warns you first:
Upload in Progress — Leaving this page will cancel the active upload. (Leave / Stay)
Resuming after a refresh
DAM can pick an interrupted upload back up after a browser refresh. This is controlled by environment variables — see Configuration. Very large batches cannot be stashed for auto-resume and will show "Batch too large to auto-resume after refresh".
Maximum File Size
DAM does not impose its own size limit. The maximum upload size is whatever your PHP configuration allows — specifically the lower of upload_max_filesize and post_max_size in your php.ini.
If a file exceeds it, the upload is rejected with a clear message:
The file is too large. Maximum allowed size is 64 MB.
To raise the limit, increase both values in php.ini and restart PHP-FPM:
upload_max_filesize = 256M
post_max_size = 256M
Blocked File Types
For security, DAM refuses to store files that could be executed by the server or run script in your browser. There is no allowlist — anything not on the blocklist below is accepted (images, PDF, CSV, XLSX, DOCX, audio, video, and so on).
Blocked extensions:
php, phtml, phar, js, py, sh, bat, pl, cgi, asp, aspx, jsp, exe, rb, jar, html, htm, xhtml, shtml, hta
Blocked operating-system junk files:
.DS_Store, ._.DS_Store, Thumbs.db, desktop.ini
Rejected files produce one of:
File has forbidden type or extension.
Uploading script files is not allowed.
Additionally, any uploaded file that is not genuine media is always served as a download rather than rendered inline, and every asset response carries X-Content-Type-Options: nosniff and a restrictive Content-Security-Policy. This means a stored HTML or SVG file can never execute script in your site's origin.
Re-uploading (Replacing) a File
To swap the file behind an existing asset while keeping its ID, tags, properties, comments, and links intact, open the asset and use Re-upload.
Uploading a file with the same name into the same directory overwrites the existing asset and clears its cached thumbnail and metadata, so the new version shows immediately.
Related
- Directory & Asset Management — organising what you have uploaded
- Directory Permissions — controlling who can upload where
- Configuration — upload concurrency and resume settings